
If you’ve ever tried gluten-free waffles, you know the struggle to get them crispy—especially once they start to cool down. Our boys are waffle fans through and through, but early on, we’d get soggy waffles that lost their charm fast. Trust me, that’s frustrating when you’re trying to make a breakfast that feels special and safe for our gluten-free family. When we first started gluten-free, finding a recipe that nailed that crispy exterior without compromising softness inside was a game changer. That’s exactly why I’m excited to share this recipe. It’s designed to stay crispy even after cooling, perfect for feeding hungry kids or making ahead for busy mornings.
Here’s the thing: for celiac families, cross-contamination is a constant worry. We always double-check every ingredient with our /is-it-gluten-free/ checker to stay safe. This recipe uses trusted gluten-free flours and baking essentials from brands like Bob’s Red Mill and King Arthur, so you can whip up waffles with confidence. The result? Fluffy, golden waffles that hold their texture and flavor.
Whether you’re new to gluten-free baking or a seasoned pro, these waffles bring a little extra joy to the breakfast table. And because they keep their crispiness so well, it means less waste, more smiles, and a happier start to your day. I can’t wait for your family to try them and love them as much as ours does.
❤️ Why You’ll Love This Recipe
- Crispy edges that don’t get soggy after cooling
- Made with easy-to-find gluten-free flours
- Perfectly fluffy inside with a golden crunch outside
- Great for make-ahead breakfasts or brunches
- Safe for celiacs when using certified GF ingredients
Ingredients & What You Need to Know
The foundation of these waffles is a reliable gluten-free all-purpose flour blend. We prefer Bob’s Red Mill 1-to-1 Gluten-Free Baking Flour because it has a mix of rice flour, potato starch, and tapioca that gives a great texture without a gritty feel. King Arthur Gluten-Free Measure for Measure also works really well here, especially if you want a slightly lighter waffle. To boost crispiness, a little cornstarch and baking powder help create that perfect rise and crunch. Using room temperature eggs and melted butter or a good-quality oil, like avocado or coconut oil, adds richness and moisture balance.
For sweetness, a touch of sugar helps with browning and flavor without overpowering. And don’t forget salt—it amps up all those flavors. We always check our ingredients with our /is-it-gluten-free/ checker to avoid sneaky gluten, especially in baking powder and vanilla extract. Each ingredient has a role, and together they make these waffles shine.
🔄 Substitutions & Swaps
- Dairy-free: Replace butter with coconut oil or vegan butter
- Milk alternative: Use almond, oat, or soy milk instead of dairy milk
- Egg substitute: Use 1/4 cup unsweetened applesauce or a flax egg per egg for egg-free waffles
- Flour blend: King Arthur Gluten-Free Measure for Measure can be used in place of Bob’s Red Mill
- Sweetener swap: Use coconut sugar or maple syrup instead of granulated sugar
- Oil option: Swap melted butter for avocado oil for a neutral flavor
Gluten-free baking can be tricky, especially with recipes like waffles where texture is everything. The combination of starches and flours in your blend plays a huge role in whether your waffles come out crispy or dense. That’s why I emphasize using a trusted blend like Bob’s Red Mill 1-to-1, which balances rice flour and starches for that perfect bite.
One common mistake is overmixing the batter. Gluten-free flours can get gummy if handled too much, and your waffles end up heavy. A gentle stir and a short rest let the ingredients hydrate and relax, resulting in a fluffier texture. Another tip: avoid stacking waffles as they cool. Steam trapped between layers leads to sogginess — use a wire rack instead.
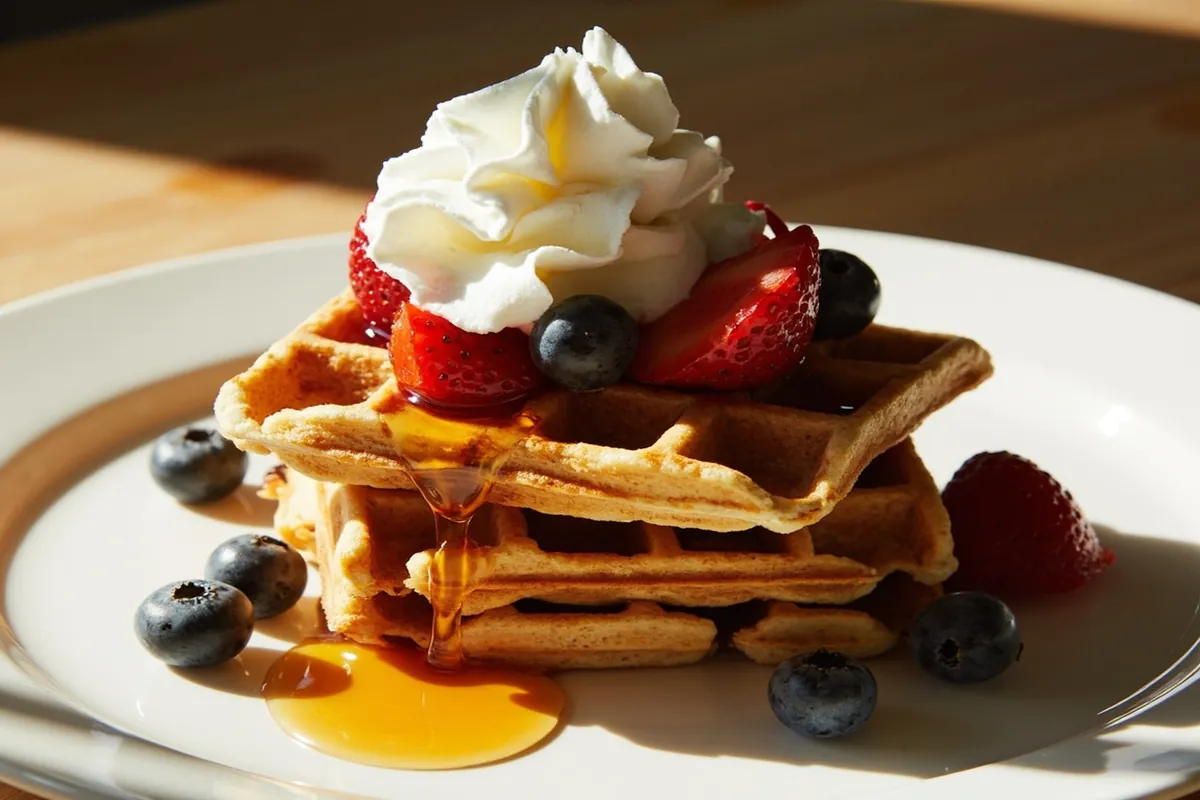
Serving these waffles is a joy. Our boys love them with fresh berries and a drizzle of pure maple syrup. For a savory twist, try topping with avocado, smoked salmon, or your favorite nut butter. They also pair beautifully with a side of crispy bacon or scrambled eggs. Whether for a weekend brunch or a quick weekday breakfast, these waffles bring warmth and comfort to the table.
How to Make Gluten-Free Waffles
💡 Pro Tips Before You Start
- Don’t overmix the batter to keep waffles light and fluffy; lumps are okay.
- Let the batter rest for 5 minutes before cooking to hydrate the flour fully.
- Use a wire rack to cool waffles; this prevents sogginess from trapped steam.
- For extra crispiness, add a tablespoon of cornstarch to your flour blend.
- Make sure your waffle iron is fully heated before adding batter for even cooking.
🗄️ Storage & Make-Ahead
- Room Temperature: Waffles can sit at room temperature for up to 1 hour on a wire rack, but they’re best eaten fresh to enjoy their crispiness.
- Refrigerator: Store cooled waffles in an airtight container or zip-top bag in the fridge for up to 3 days. Reheat well to restore crispiness.
- Freezer: Freeze waffles in a single layer on a baking sheet. Once frozen, transfer to a freezer-safe bag for up to 2 months. Reheat directly from frozen.
- Reheating: Reheat waffles in a toaster or toaster oven on medium heat for 2-3 minutes to bring back crisp edges without drying them out.
-
2 cups gluten-free all-purpose flour (we use Bob’s Red Mill 1-to-1) -
2 tablespoons granulated sugar -
1 tablespoon cornstarch -
1 tablespoon baking powder (gluten-free) -
1/2 teaspoon salt -
2 large eggs, room temperature -
1 3/4 cups milk (dairy or dairy-free) -
1/4 cup unsalted butter, melted (or coconut oil for dairy-free) -
1 teaspoon vanilla extract (gluten-free) -
Optional non-stick spray or extra butter for waffle iron
-
1Preheat and Prep
Preheat your waffle iron according to the manufacturer’s instructions. Lightly grease it with non-stick spray or brush with melted butter to prevent sticking. -
2Mix Dry Ingredients
In a large bowl, whisk together the gluten-free flour, sugar, cornstarch, baking powder, and salt until evenly combined. -
3Combine Wet Ingredients
In a separate bowl, beat the eggs. Add the milk, melted butter, and vanilla extract, mixing well. -
4Make the Batter
Pour the wet ingredients into the dry ingredients. Stir gently until just combined; the batter should be slightly lumpy but without large pockets of dry flour. -
5Cook the Waffles
Pour batter onto the preheated waffle iron—usually about 1/3 to 1/2 cup, depending on your iron size. Close the lid and cook until waffles are golden brown and crisp, about 4-6 minutes. -
6Keep Warm or Serve
If not serving immediately, place cooked waffles on a wire rack set over a baking sheet in a warm oven (around 200°F) to keep them crispy. Avoid stacking them, which traps steam.
Calories
Protein
Carbs
Fat
Fiber
Sugar
Sodium
Nutrition is estimated using a food database. Values may vary based on the specific brands and ingredients you use.
Frequently Asked Questions
Is this waffle recipe gluten-free?
Yes! This recipe uses certified gluten-free ingredients like Bob’s Red Mill flour and gluten-free baking powder, making it safe for celiac and gluten-sensitive folks when prepared carefully.
Can I make these waffles dairy-free?
Absolutely. Swap the butter for coconut oil or a vegan butter substitute, and use your favorite dairy-free milk such as almond or oat milk.
Why did my waffles turn out soggy?
Sogginess often happens if you stack waffles while they’re still warm or don’t cook them long enough. Make sure to cook until golden and crisp, and cool on a wire rack to keep them from steaming.
Can I freeze gluten-free waffles?
Yes! Freeze waffles in a single layer before transferring to a freezer bag. Reheat straight from frozen in a toaster or oven for best texture.
What gluten-free flour works best for waffles?
We recommend Bob’s Red Mill 1-to-1 Gluten-Free Baking Flour for its balanced texture. King Arthur Gluten-Free Measure for Measure is another great option for lighter waffles.
I hope this recipe brings a little extra joy to your breakfast table the way it has for our family. Our boys can’t get enough of these waffles, and I love how easy they are to make and customize. Remember, gluten-free baking is a journey—there will be tweaks, but this recipe is a solid go-to for crispy, dependable results. Don’t forget to check all your ingredients with our /is-it-gluten-free/ food checker to keep your kitchen safe. If you try these waffles, I’d love to hear how they turned out! And when you’re ready for more, explore our other gluten-free recipes for breakfasts, snacks, and beyond. Here’s to happy, healthy eating with your loved ones!
We’d love to hear how it turned out! Leave a comment and a star rating below — your feedback helps other readers and means the world to us.
Rate This Recipe
Did you make this? We'd love to hear how it turned out!