
You followed the recipe exactly. You measured everything, used your favorite gluten-free flour blend, set the timer — and pulled out a loaf that could double as a doorstop. If this sounds familiar, I want you to know: you are not alone, and you are not bad at baking. Gluten-free baking problems are real, and they have real explanations.
The honest truth is that gluten-free baking operates by completely different rules than conventional baking. Without gluten — the protein network that gives wheat-based baked goods their structure, stretch, and chew — everything from moisture retention to rise to crumb texture changes. What worked in your grandmother’s kitchen simply won’t work the same way in a gluten-free one.
I’ve been baking gluten-free for years, and I’ve had every disaster in the book. Gummy banana bread. Cookies that spread into one giant flat puddle. Muffins with a crater in the middle. After a lot of trial, error, and digging into the food science behind it, I’ve figured out what actually goes wrong — and more importantly, how to fix it.
In this guide, I’m breaking down the most common gluten-free baking problems, explaining the science behind them, and giving you practical, actionable fixes you can use on your very next bake.
Key Takeaways
- Most gluten-free baking problems come down to missing structure, incorrect moisture balance, or flour blend issues — all fixable once you know what to look for.
- Adding a binder like xanthan gum or psyllium husk can dramatically improve texture in dense or crumbly gluten-free baked goods.
- Gummy centers are almost always caused by underbaking or excess moisture — not a bad recipe.
- Letting gluten-free doughs and batters rest before baking gives the starches time to hydrate and improves final texture.
- Certified gluten-free flour blends vary widely — understanding what’s in your blend helps you troubleshoot and adjust recipes accurately.
Why Gluten-Free Baking Is Harder (And It’s Not Your Fault)
Gluten is a protein formed when water is added to wheat flour and the dough is mixed. It creates a web-like structure that traps air, holds moisture, and gives baked goods their elasticity. When you remove gluten, you lose all of that — and no single substitute does everything gluten does.
Gluten-free flours are made from starches and alternative grains like rice, tapioca, potato, sorghum, and chickpea. Each behaves differently when wet, heated, or mixed. That’s why a recipe that works beautifully with Bob’s Red Mill 1-to-1 Baking Flour might fall flat with a homemade rice flour blend — or vice versa.
The good news? Once you understand why things go wrong, you can fix them. Let’s go through the most common gluten-free baking problems one by one.
Problem 1: Dense, Heavy, or Brick-Like Bread and Muffins
This is the most common complaint I hear, especially from people who are new to gluten-free baking. You pull a loaf out of the oven and it’s dense, heavy, and nothing like the light bread you were hoping for.
Why it happens: Without gluten’s elastic network, there’s nothing to trap the gas bubbles produced by your leavening agents. The batter can’t hold its rise. You also lose the “spring” that happens during baking, called oven spring, which gives conventional bread its airy crumb.
The fixes:
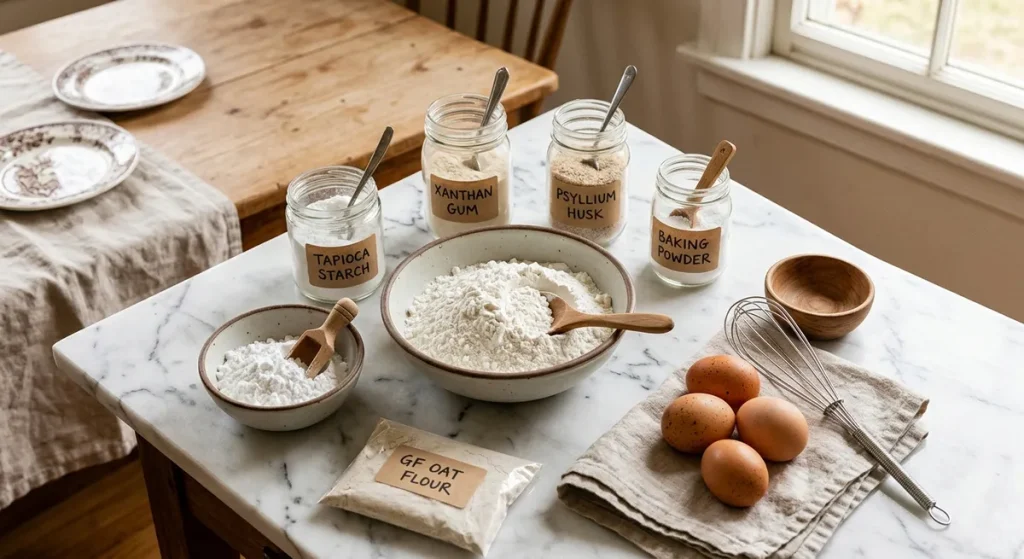
- Add a binder. Xanthan gum, psyllium husk powder, or ground flaxseed help mimic gluten’s structure. Most commercial blends include xanthan gum, but if yours doesn’t — or if you’re using a single-flour recipe — you’ll need to add it. A typical ratio is ¼ teaspoon per cup of flour for cakes, ½ teaspoon per cup for bread.
- Use room-temperature eggs. Cold eggs don’t whip as well and can deflate your batter. Let them sit out for 30 minutes before baking.
- Don’t skip the rest time. Letting your batter rest for 20–30 minutes before baking gives starches time to fully absorb liquid, which improves rise and texture significantly.
- Check your leavening. Old baking powder and baking soda lose their effectiveness. Replace them every 3–6 months and measure precisely — too little means no rise, but too much can cause a collapse.
Problem 2: Gummy or Undercooked Centers
You bake until the toothpick comes out clean, let it cool, slice it — and the center is dense, wet, and almost raw-tasting. This one is genuinely frustrating because it looks done on the outside.
Why it happens: Gluten-free flours, especially those high in starch (like tapioca or potato starch), hold onto moisture differently than wheat flour. The center of a loaf or muffin takes much longer to reach the temperature needed for the starches to fully gelatinize and set. A clean toothpick can be deceiving if it misses the densest part of the bake.
The fixes:
- Use an instant-read thermometer. For gluten-free bread, the internal temperature should reach 205–210°F before you pull it from the oven. For muffins and cakes, aim for 200–205°F. A toothpick test alone isn’t reliable enough.
- Tent with foil. If your bread is browning too fast on top before the center is done, loosely tent it with aluminum foil and keep baking. This lets the inside finish cooking without burning the crust.
- Reduce wet ingredients slightly. If gumminess is a recurring problem with a specific recipe, try reducing liquid by 2–3 tablespoons and see if it helps.
- Cool completely before slicing. This one is hard, I know. But cutting into gluten-free bread before it’s fully cooled will almost always result in a gummy, compressed crumb. The starches need time to set as they cool.
Problem 3: Cookies That Spread Too Much (or Not Enough)
Gluten-free cookie problems tend to go one of two directions: a flat, lacy puddle that runs together on the pan, or a thick, dry mound that barely spreads at all. Both are frustrating, and both have specific causes.
Why cookies spread too much: Without gluten to hold shape, cookies rely on fat, eggs, and sugar for structure. Too much fat, warm butter, or a flour blend heavy in starches will cause excessive spread. High-starch flours melt quickly in the oven before the cookie can set.
Why cookies don’t spread enough: Too much xanthan gum or a flour blend high in protein (like chickpea or sorghum flour) can make dough stiff, resulting in cookies that look raw and cakey even when fully baked.
The fixes for too much spread:
- Chill your dough for at least 30–60 minutes before scooping and baking. Cold fat spreads more slowly.
- Add 1–2 tablespoons more flour to stiffen the dough slightly.
- Use parchment paper or a silicone mat — both help control spread compared to an unlined pan.
The fixes for too little spread:
- Reduce xanthan gum by ¼ teaspoon and see if the texture loosens up.
- Add 1 tablespoon of milk or water to thin the dough slightly.
- Flatten dough balls slightly with your palm before baking.
Problem 4: Crumbly Texture That Falls Apart
You slice the muffin, pick it up, and it disintegrates in your hand. Or your pie crust crumbles before you even get it into the pan. Crumbliness is a structural problem — and it almost always comes back to missing binders.
Why it happens: Gluten acts as the glue that holds crumbs together. Without it, starches and alternative flours don’t bond to each other the way wheat proteins do. Some gluten-free flour blends also absorb liquid unevenly, leaving pockets of dry, unhydrated flour throughout the final product.
The fixes:
- Add a binding agent. If your recipe doesn’t include xanthan gum, psyllium husk, or ground flaxseed, that’s likely the issue. Start with ¼ teaspoon xanthan gum per cup of flour.
- Add an extra egg yolk. Yolks are rich in fat and lecithin, which help bind baked goods. Adding one extra yolk (without the white) can dramatically improve texture in cakes and muffins.
- Try adding a teaspoon of apple cider vinegar. This reacts with baking soda to improve rise and helps bind the crumb.
- Let it cool fully. Gluten-free baked goods are structurally weaker when warm. Cutting or handling them before they’re completely cooled is a major cause of crumbling.
Our Top Flour Blends for Avoiding These Problems
A lot of gluten-free baking problems start with the flour. Not all blends are created equal, and the wrong one for your recipe can cause issues that have nothing to do with your technique. Here are the blends I trust and use in my own kitchen:
This is my go-to for almost everything. It includes xanthan gum, has a reliable blend of rice flour and potato starch, and performs consistently across cakes, muffins, and cookies. Certified gluten-free by GFCO. Around $7–9 for a 44 oz bag.
Another excellent all-purpose blend with xanthan gum included. Performs especially well in cakes, pancakes, and quick breads. Certified gluten-free. Around $8–10 for 3 lbs. See our full review at King Arthur Gluten-Free Flour.
Higher in protein thanks to nonfat milk powder, which helps with browning and structure. Great for pie crusts and pastry. Around $12–14 for 3 lbs. Note: contains dairy, so not suitable for dairy-free bakers.
A single-ingredient flour for those building their own blend. Batch-tested for gluten. Best used in combination with a starch and binder — not a standalone swap for all-purpose flour.
Blends to be cautious with: Generic store-brand GF flour blends often use a higher ratio of tapioca starch, which can result in gummy textures in anything baked longer than 20 minutes. They also may not include xanthan gum. Always check the ingredient list before you bake.
Common Mistakes That Make Gluten-Free Baking Problems Worse
Watch Out for These GF Baking Mistakes
- Substituting a single-ingredient gluten-free flour (like almond flour or coconut flour) 1:1 for all-purpose flour — these require completely different ratios and recipes
- Skipping the rest period after mixing batter — GF starches need time to hydrate before baking
- Using cold eggs or cold butter straight from the fridge — temperature matters more in GF baking
- Not measuring flour by weight — volume measurements are inconsistent with GF flours, which are denser and pack differently than wheat flour
- Opening the oven door too early — gluten-free baked goods are structurally fragile and can collapse before they’ve set
- Ignoring internal temperature — relying only on a toothpick test leads to underbaked, gummy results
Frequently Asked Questions About Gluten-Free Baking Problems
Sinking usually means too much leavening, too much liquid, or underbaking. When there’s too much gas produced early in baking, the structure can’t support it and collapses as it cools. Try reducing your baking powder by ¼ teaspoon and make sure the internal temperature reaches at least 205°F before removing from the oven.
No — almond flour behaves very differently from starch-based gluten-free blends. It’s high in fat and protein, low in starch, and absorbs liquid differently. Recipes written for almond flour are specifically designed for it. Substituting it into a recipe that calls for a standard GF blend will likely result in a dense, greasy, or collapsed final product.
Not always, but usually. Most GF baked goods need some kind of binder to replace gluten’s structural role. If your flour blend already contains xanthan gum, don’t add more — too much creates a gummy, dense texture. If you prefer to avoid xanthan gum, psyllium husk powder is a good alternative and works especially well in bread recipes.
Grittiness usually comes from rice flour that hasn’t been finely milled. Look for “superfine” or “finely ground” rice flour on the label — brands like Bob’s Red Mill and Anthony’s Goods offer finely milled options. Letting your batter rest before baking also helps starches fully absorb liquid, which reduces that sandy texture in the final product.
Sometimes. Gluten-free baked goods often benefit from a slightly lower oven temperature (25°F lower than the recipe suggests) paired with a longer bake time. This allows the interior to fully cook and set without the outside over-browning. An oven thermometer is one of the best investments you can make for GF baking success.
Master the Science, Not Just the Recipe
Gluten-free baking problems are incredibly common, and they’re almost never a reflection of your skill as a baker. The real issue is that most of us learn to bake using wheat-based rules — and then try to apply those same rules to completely different ingredients. Once you understand the science behind what gluten actually does, and what replaces it in a GF kitchen, the fixes start to make sense.
Start with a reliable, certified gluten-free flour blend that includes a binder. Use a thermometer instead of guessing. Rest your batters. Cool completely before cutting. These aren’t complicated changes — but they make a real difference in your results. My boys now ask for seconds on gluten-free banana bread and birthday cake, which felt impossible in my early baking days.
If you’re still getting used to gluten-free cooking and want a structured plan to follow, I’d love to share our free 4-Week Gluten-Free Meal Plan with you. It includes breakfast ideas, batch cooking tips, and grocery lists that make the whole process feel a lot less overwhelming. Drop your email below and I’ll send it straight to your inbox.
