
Yes — gluten-free bread does need a different rising time than regular bread, and understanding why can be the difference between a loaf you’re proud of and one you quietly throw in the trash. The short answer: most gluten-free doughs require only one rise, and that rise is typically shorter than what traditional wheat bread needs.
When I first started baking gluten-free bread for my family, I followed my old wheat-bread instincts. I let the dough rise twice, waited for it to double, and ended up with a dense, crumbly mess every single time. It took me a while to understand that gluten-free dough plays by completely different rules — and once I learned those rules, everything clicked.
Gluten-free bread rising time differs from traditional bread because GF doughs lack the gluten network that traps gas and holds structure during fermentation. Without that network, over-proofing happens fast, and it causes collapse rather than a beautiful crown.
In this article, I’ll break down exactly why GF dough behaves differently, how long your rise should actually be, and how to troubleshoot when your loaf isn’t cooperating. Whether you’re brand new to GF baking or still getting inconsistent results, this guide is for you.
Key Takeaways
- Gluten-free bread typically needs only one rise of 30–60 minutes, compared to two rises totaling 2–3 hours for traditional bread.
- GF dough lacks the gluten network that supports structure, so over-proofing causes collapse — not a better loaf.
- Xanthan gum, psyllium husk, and eggs replace gluten’s structural role and directly affect how your dough rises.
- Temperature matters just as much for GF doughs — a warm, draft-free environment (75–80°F) produces the most consistent results.
- Recognizing the signs of proper proofing (not just watching the clock) will dramatically improve your success rate.
Why Gluten-Free Dough Behaves So Differently
To understand the gluten-free bread rising time difference, you first need to understand what gluten actually does in traditional bread. Gluten is a protein network formed when wheat flour is mixed with water. That network is stretchy and elastic — it traps the carbon dioxide gas that yeast produces and holds it in place, allowing the bread to rise and then maintain its shape during baking.
Gluten-free flours — like rice flour, tapioca starch, sorghum flour, or potato starch — don’t form that network. They’re essentially independent particles suspended in the dough. When yeast produces gas in a GF dough, there’s no elastic web to hold it efficiently. The dough can rise, but it’s working against itself the entire time.
This is why binders like xanthan gum and psyllium husk are so critical in GF bread recipes. They act as a partial substitute for gluten’s structural role, giving the dough some elasticity and gas retention. But they’re not a perfect replacement — and that gap is exactly why the rising timeline has to change.
The Gluten-Free Bread Rising Time Difference Explained
Traditional wheat bread typically follows a two-rise process. The first rise (bulk fermentation) lasts 1–2 hours. After shaping, the second rise (proofing) runs another 45–90 minutes. The total time from mix to oven can easily be 3–4 hours.
Gluten-free bread is different in two important ways:
How Yeast Activation Differs in Gluten-Free Recipes
Yeast itself doesn’t care whether it’s in wheat dough or GF dough — it activates and produces carbon dioxide the same way in both. What changes is what happens to that gas once it’s produced.
In a wheat dough, the gluten network catches and holds gas bubbles throughout the entire mass. In a GF dough, gas retention depends heavily on binders, moisture content, and the specific flour blend you’re using. Rice flour blends hold gas differently than oat-based or sorghum-based blends.
This means yeast activation should be done exactly the same way — proof your yeast in warm water (105–115°F) with a pinch of sugar for 5–10 minutes until foamy. If it’s not foamy, your yeast is dead and no amount of rise time will save your loaf. From there, the dough handles things differently.
One more thing worth knowing: GF doughs are typically much wetter than wheat doughs. They’re often closer to a thick batter than a kneadable dough. This higher hydration helps gas bubbles form and the dough rise, but it also means the structure is more fragile. That’s another reason why one rise — and watching it carefully — matters so much.
Signs Your Gluten-Free Bread Is Properly Proofed (And Signs It’s Not)
Learning to read your dough is the most valuable skill in GF bread baking. Here’s what to look for:
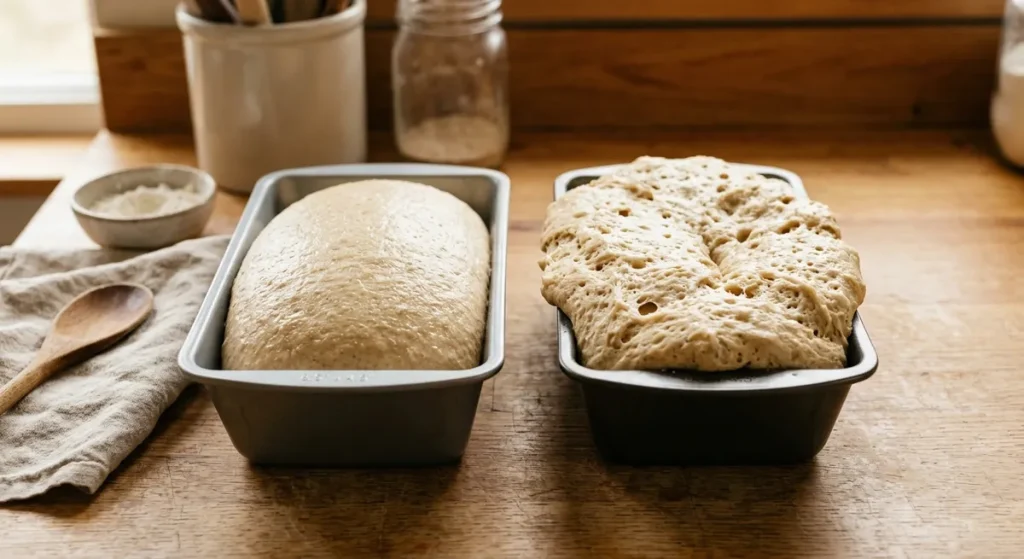
Signs of Proper Proofing ✅
- Dough has risen to just at or slightly above the rim of the loaf pan
- Surface looks slightly domed, not sunken or cracked
- Dough appears lighter and airier than when you first shaped it
- A gentle poke with a floured finger leaves an indent that slowly springs back
- Rise took approximately 30–60 minutes in a warm environment
Signs of Over-Proofing ❌
- Dough has risen well past the pan rim and looks like it might spill over
- Surface has large cracks or bubbles
- Dough collapses when you gently poke it
- After baking, loaf has a large depression in the center (the classic GF bread cave-in)
- Texture is gummy and dense despite baking fully
Signs of Under-Proofing ❌
- Dough barely moved from its original shape after 60+ minutes
- Surface is still dense-looking, no airiness
- After baking, loaf is very dense and brick-like
- Crust cracked dramatically on top in the oven (oven spring trying to compensate)
Our Top Picks: Products That Make GF Bread Rising Easier
The right tools and binders make a real difference in how predictably your GF bread rises. Here are the products I trust in my own kitchen.
Psyllium husk is the closest thing to gluten’s structural role that I’ve found for GF bread. Anthony’s is finely ground, consistent batch to batch, and their psyllium husk powder is widely available. It helps GF dough hold gas bubbles and gives the bread a chewy texture that xanthan gum alone can’t achieve. My sandwich bread recipe doesn’t work without it.
Already contains xanthan gum, which simplifies your rise time because the binder ratio is pre-calculated. Great for beginner GF bakers. Around $7–9 for a 22 oz bag at most major grocers.
Activating yeast at the right water temperature (105–115°F) is non-negotiable. Too hot kills the yeast; too cool and it won’t activate properly. A reliable thermometer removes the guesswork entirely. Around $15–20.
The straight sides and aluminized steel construction of USA Pan loaf pans provide even heat distribution and better oven spring for GF bread. This is the pan I use every week. Around $20–25.
Reliable, widely available, and consistent — which matters when you’re troubleshooting rising issues. Fresh yeast makes a genuine difference. Around $5 for a 3-pack of 8g packets.
One to approach with caution: Pre-made GF bread mixes that don’t specify rise time on the package. Every GF flour blend behaves differently, and a mix without clear proofing instructions often leads bakers to default to wheat-bread timing — which almost always results in over-proofing. Look for mixes from brands like Pamela’s Products or King Arthur Baking Company that include specific GF proofing guidance.
Common Mistakes That Ruin Gluten-Free Bread Rise
- Doing a second rise: This is the number one mistake I see. GF dough doesn’t benefit from a second rise the way wheat dough does. It weakens the binder network and almost always causes the loaf to collapse.
- Waiting for the dough to double: That’s a wheat-bread rule. GF dough should rise 50–75% at most. Doubling usually means you’ve over-proofed.
- Using water that’s too hot for yeast activation: Anything above 120°F will kill your yeast. Use a thermometer — don’t guess.
- Proofing in a cold kitchen: If your kitchen is below 70°F, your yeast will struggle. Rise time can stretch to 90 minutes or more, and results become unpredictable. Use the oven-light trick.
- Skipping the binder entirely: Xanthan gum or psyllium husk isn’t optional for yeast-raised GF bread. Without it, the dough has almost no gas retention ability and won’t rise meaningfully.
- Opening the oven during baking: GF bread is more structurally vulnerable than wheat bread during the first 20 minutes of baking. Opening the oven door causes a temperature drop that can lead to collapse. Resist the urge.
Frequently Asked Questions
Most gluten-free bread recipes call for a single rise of 30–60 minutes in a warm environment (75–80°F). The exact time depends on your recipe, your flour blend, and the temperature of your kitchen. Watch for the dough to reach just at or slightly above the rim of the loaf pan rather than relying strictly on time.
No — and doing a second rise is one of the most common GF bread mistakes. Gluten-free doughs don’t have the gluten network needed to recover and reorganize between rises. A second rise weakens the binder structure and typically causes the loaf to collapse in the oven or produce a gummy interior.
A sunken center is almost always caused by over-proofing or too much moisture in the dough. If the dough rises past the sweet spot — that 50–75% increase — it becomes too weak to hold its structure during baking and collapses. Try shortening your rise time by 10–15 minutes and see if that helps. Also make sure your baking temperature is accurate; a too-cool oven can cause the same problem.
Some GF recipes do support a slow, cold rise in the refrigerator overnight — this is called cold fermentation. It can actually improve flavor. However, not all GF flour blends and binder combinations are suited for this technique. If your recipe wasn’t written for a cold rise, stick to the single room-temperature rise to avoid unpredictable results.
First, check your yeast — it may be expired or it may have been killed by water that was too hot. Re-proof a fresh packet in 110°F water with a pinch of sugar; if it’s not foamy after 10 minutes, the yeast is dead. Second, check your kitchen temperature. A cold environment significantly slows or stops yeast activity. Move the dough to a warmer spot and give it more time before assuming it failed.
From Dense Bricks to Soft Slices
The gluten-free bread rising time difference comes down to one simple fact: without a gluten network, GF dough can’t handle the same fermentation timeline as wheat bread. One rise, shorter timing, and attention to visual cues rather than the clock — that’s the framework that works. Once I stopped treating my GF dough like wheat dough, my results improved dramatically, and my boys actually started requesting homemade bread instead of avoiding it.
If your loaves are still collapsing, caving in, or coming out dense, the problem is almost always in the proofing stage. Revisit your binder quantities, your yeast freshness, your water temperature, and your rise environment before changing anything else. The fixes are almost always simpler than you think.
Want more help getting your GF baking dialed in? Download our free 4-Week Gluten-Free Meal Plan PDF — it includes baking prep tips and a weekly bread baking schedule so you’re never without a fresh loaf.
